Monday, February 22, 2010

Love at first sight

Six years ago today, I met the boy of my dreams. He literally was the boy of my dreams. Cameron Douglas Zay was born at 6:33 pm on Sunday February 22, 2004. After a nightmarish difficult pregnancy, he was delivered during a nightmarish difficult delivery, despite all medical understanding, alive and healthy. I had dreamt of being a mother. In my dreams I always had 4 kids, 3 boys and a girl. My reality was much different. After a tumor on my left ovary left my ovary damaged and my right ovary needing to be removed while I was pregnant with Cameron I suffered several early term miscarriages. We knew after lots of heartache that we would never have any additional children. And even though it was heartbreaking to know accept it, we were so blessed to have this one prefect little child to love. I sit here, way too early in the morning for my own good, just so thankful that my lil guy, who shouldn't have been, is now 6 years old!


To Cameron, you are the child I always wanted and struggled so hard to get here alive. You have been my greatest joy. I look at you everyday and am just so thankful that God trusted me enough to be your mother. I always feel inadequate and that I'm not doing it right. That there should be more . . . more to teach you, more to play more more more. I guess that's because I want everything for you. And although that is an unrealistic idea, I can't give you everything, I can give you the best that I have. I know I get frustrated and for that I'm sorry. It's the parents curse. I hope that you look back on your childhood with the fondest of memory’s. I hope that someday you look back at the things we did as a family and that you are so happy with the childhood you got. I hope that you continue to grow big and strong. I hope that you remain close to our family as you get older and love the feeling of a close family. I hope that you keep your faith. You have such a wonderful "childlike" faith, you really love God and you keep daddy and I accountable, in ways you can't even grasp. I can't wait to see what the Lord has in store for you for your life!

Love Mommy

Photobucket

Photobucket

Saturday, January 16, 2010

R-E-A-D

I had the idea to make Cameron a reading tool. I took all of his four letter vocabulary words and wrote them in a list. I created a grid system on a piece of paper so that only one letter was in each box going across. I then went through each word and each line and got rid of any additional letters so I wouldn't have duplicates in each stack. I then decided what letters would go in each stack to create the words I needed. I then started cutting my paper.

I used my Cricut to create perfect rectangles.
Photobucket
Photobucket

Using letter stickers I started making the actual letter stacks making sure not to get my stacks out of order.
Photobucket
Photobucket

Then using contact paper I "laminated" each of the rectangles so they would withstand being used.
Photobucket

Figuring the actual construction of the reader was almost as difficult as figuring out which letters to use and how. But I finally decided on a "tent" design. Using 12x12 heavy weight chipboard, I cut 4x12 strips.
Photobucket
Photobucket

I then took black card stock and covered the back and front of my chipboard pieces using Modge Podge.
Photobucket


While the Modge Podge was drying on the stand I used my Crop o'Dile Big Bite to punch holes into the top of my letter cards, measuring to make sure that they were even. I punched 2 holes per card.
Photobucket
Photobucket

I then laid out four of my letter rectangles across my stand so I could decide where the holes should be. I then punched the holes in the stand.
Photobucket

Using one inch Bind-It-All owire I cut 8 rings off. I then used my BIA to Bind all of the rectangles to the stand, making sure that the stand would stand up and the cards could be flipped.
Photobucket

Then using 2 lengths of ribbon I ran it through the eyes of 2 buttons.
Photobucket

I then punched a small hole in the rear stand base and fed the ribbon through, tying a knot. I then cut a slit using my Crop o' Dile just big enough to slip the button through so that when the button was up right it would not allow the button back through the whole. The length of ribbon was just big enough to create the "tent" that I was hoping for. Now Cameron can flip different letters to make TONS of vocab and sight words!
Photobucket
Photobucket


Also, you can push the buttons back through the holes and flip the rear cover around to protect the cards while it's not in use.

Thursday, January 14, 2010

Pumpkin Palooza 2009

This is me, "If I can't make it, grow it or find it on clearance, I probably don't need it". I'm definitely up for new and challenging things. I also believe in preservation, whether this of the earth, our belongings, our food our clothes but especially our money. So In November I decided to try my hand at canning pumpkin. I have cooked down pumpkin before, but I froze it in the past. I wanted it to have a longer shelf life, enter canning. I have canned things like jalapenos and apples and apricots but with pumpkin, you have to pressure can (because of the risk of botulism), you can't just water bath can, which has been the only method I had known. So I hit the Internet and started researching. I found lots of tips and suggestions. I called my dad and asked to borrow his pressure caner and set out to find pumpkins. Well here's the thing, finding pumpkins the day after Halloween is HARD.

My first choice for pumpkins were "sugar baby's" or "pie pumpkins" these differ from jack o' lanterns because of their size. They are also more dense and sweater. You can eat any kind of pumpkin, but "pie pumpkins" are the best. Sometimes grocery stores will have a few of these on hand, but more often then not, these little guys are the ones that are usually painted.

I finally scored a couple of days into Nov and founds pumpkins, small jack o lanterns, on clearance at Fresh and Easy. I had scored some painted "pie pumpkins" at Staters and Walmart, and even though I was happy to have them, scrapping the paint off was kind of a pain.

So here is my pumpkin stash
Photobucket

I cut the pumpkins in half and de-seeded them. This particular guy is a "pie pumpkin". You can see that the wall of the pumpkin are thick and the seed cavity is shallow with not many seeds. You can also see that it's a bright/deep orange as opposed to a yellowish orange color. I scraped out the seeds using my ice cream scoop.
Photobucket

We have a relatively small kitchen, so I used two steamers on the stove top and a pan in microwave. The microwave is considerably faster, but I can't steam as much at once. You need to cook your pumpkin till fork tender, as shown in the second picture.
Photobucket
Photobucket

I was steaming it quicker then I could peel or slice it, so I was making a large pile of pumpkin on a tray. This also allowed the pumpkin enough time to cool before I handled it.
Photobucket

I took my chunks of steamed pumpkin and sliced it into slices. I was able to take each of these slices and remove the skin with just one slide of the pairing knife.
Photobucket

I then cut it into large chunks and placed in a bowl. I filled the bowl before I started filling jars.
Photobucket

I must have gotten tired, or messy and didn't pick up the camera again. So I don't have any pictures of the pumpkin in the jars. I used quart mason jars I filled each jar with the chunked pumpkin. I then filled each jar with water and a little canning salt. Then using a caning spatula I scraped the sides of the jars trying to release any air that could be in the jars. Once all the air was out of the jars, I placed on the flat lids then hand tightened the screw lids. 7 quart jars fit in the pressure caner at one time. They take about 2 hours per batch.
Photobucket

I ended up with 35 quarts of pumpkin!Everyone asked what I was going to do with so much pumpkin. We make a lot of things with pumpkin and well after seeing this news report, I might be able to make a little money next year!

Normales

My heritage is Norwegian and mutt. My dad's family has been here for quite some time. To my knowledge my maternal grandfathers family has been here for a long time too. But my maternal grandmother, was a first generation American. Her parents immigrated from Norway. I spent the first almost 9 years of my life living in San Diego, in Mira Mesa to be exact. Mira Mesa has a large Filipino population and of course being that close to the border, there is a large Mexican influence. I grew up getting to enjoy a VERY diverse menu! When we moved to Our small town, we lost the Filipino influence in our cuisine, but the Mexican influence became somewhat . . . stronger. Over the years one of my favorite Mexican foods has become Tamales. But they are not common, most people don't make them and if you buy them you can expect to pay at least $1 each. Always the economist, I decided that if I can grow and preserve my own food then surely I could make tamales! I will say this, of all the adventures in the kitchen that I've taken, this one worried me the most. Tamales are one of those things that are either SO good or SO bad. There really isn't middle ground. Being a Norwegian kid, I was a little anxious. So I did my homework (thank you bing search!) and found recipe's and tips.

I started by making my meat. I knew, in all reality this was going to take the longest amount of time. I took a large chuck roast and put it in my crock pot fully submerged. I left it on all day and let it cook till it was falling apart. I then made a red sauce. Let me tell you, the smartest thing I did during my tamale adventure was I tasted my red sauce before I added my meat. It was NOT good! So I threw away my red sauce (so much for the recipe on sauces I found). I started to think about flavors I like and went from there. I took a large can of green enchilada sauce, a medium white onion and two cans of diced green chili's. It smelled good so I added my meat. I let it slow cook on my stove top for about an hour or so. This allowed the flavors to really soak in! While my meat was slow cooking (again) I made my masa.

When I told people that I made tamales their first question was "difficult huh?" Me, "um, not so much. Way easier than canning 35 quart jars of pumpkin!" Their second question was "where did you get your masa from?" Me, "I made my own" them "what! Really?!" The answer was yes and of the whole process, I would say this was the easiest part. And again the part that had me the most worried. 85% of a tamale is it's masa, bad masa, bad tamale!

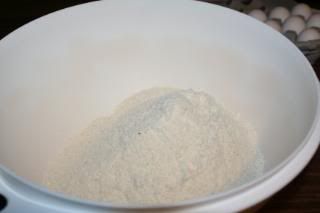
I started with 2 lbs of corn masa
Photobucket

I then added my spices. 1 Tbs Salt, 3 Tbs Chili powder, 1 Tbs Cumin, 3 Tbs onion Powder.
Photobucket


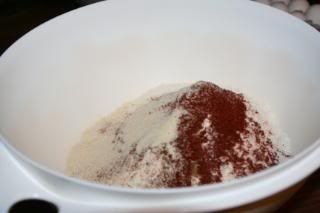
I blended the masa corn and the spices well before adding any liquid. I didn't want to have a "spice chunk" somewhere in my masa. I then added 2 cups of corn oil. I wanted to stay away from lard, because frankly, even though it gives it a good flavor it is SO bad for you!
Photobucket

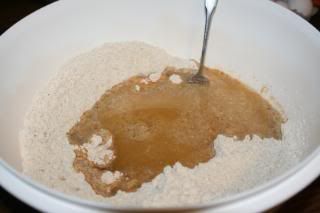
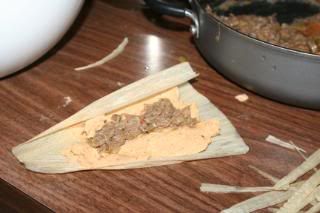
I then added roughly 2 quarts of beef stock to my mix. I used the water I had cooked my roast in, draining off the fat. This added VERY good flavor. I mixed my masa to a peanut butter consistency. I had my corn husks soaking in water for about 2 hours to soften them up. When they were ready I spread my masa onto a husk, covering about 2/3 of the husk, leaving enough room for rolling.
Photobucket

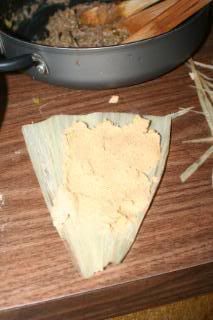
I then filled the tamale with the seasoned roast
Photobucket

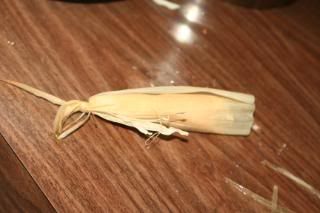
When I got the tamale rolled, making sure the meat was covered with masa I tied the end off using torn husks as ties.
Photobucket

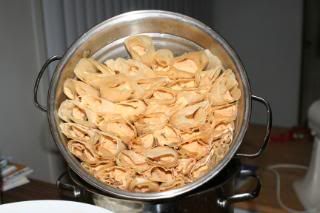
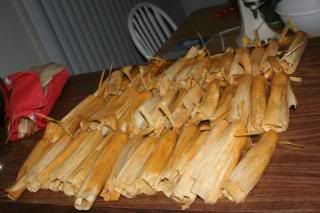
I filled my steamer with the tamales till I ran out of meat (about 3.5 dozen)
Photobucket

And then steamed the tamales for 2 hours, checking the water level and adding water when needed. After the 2 hours, I pulled one tamale out of the steamer and left it on the counter for 5 minutes to set. I then unwrapped it to see if it was cooked. Success!

Photobucket

Since the first time I made tamales I have made two more batches. One additional batch with beef and the second with pork. When I ran out of pork I still had masa so I made about 20 or so tamales with cheese and green chili's. These were such a huge hit, they were gone within minutes!